Last Updated on January 23, 2022
Canon Camera Buttons and Settings Explained
Getting More Out of Your Canon
Page Contents
Canon is the leading camera manufacturer and seller from across the globe. Some of Canon’s cameras have transcended normal sale patterns and became legends regarding sales and performances, while also being the pioneers in some of the interesting revolutions in the world of DSLRs.
This guide will help you use the features and buttons properly.
Top of the Camera
Taking into reference the Canon DSLR’s, we study the various controls at the top of the camera. Some of the standard buttons on most Canon professional DSLRs on the top are:
The On-Off Switch

Read more: Buying guide for DSLR Camera: Reasons to Buy a DSLR
The on-off switch simply does what it is intended to do: switches the camera on and off. This switch is located on the top left side (left of the flash mount) alongside Mode Dial.
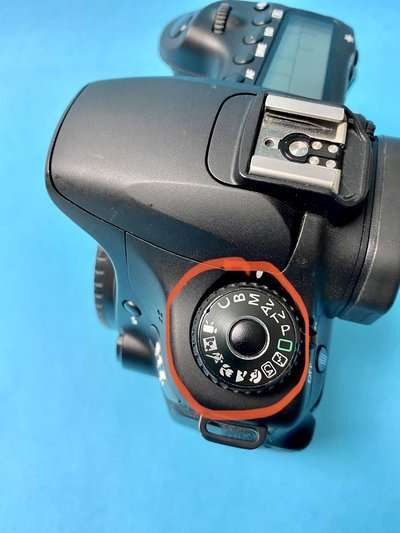
The Mode Dial
Read more: Canon EOS RP Review
The mode dial is located next to the on-off switch. The mode dial has all the settings, which can be changed only by pressing the button in the center of the dial. In its resting state, the button locks the camera mode from accidentally getting changed. The lock feature isn’t available in prosumer and beginner DSLRs of Canon.
The options on the Mode Dial are:
- A or the Auto Mode
- Program Auto Mode
- Tv or Time Value or Shutter Priority Mode
- Av or Aperture Value or Aperture Priority Mode
- M or Manual Mode
- B or Bulb Mode
- C1, C2, C3 – The three custom modes that can be used to save three different manual settings.
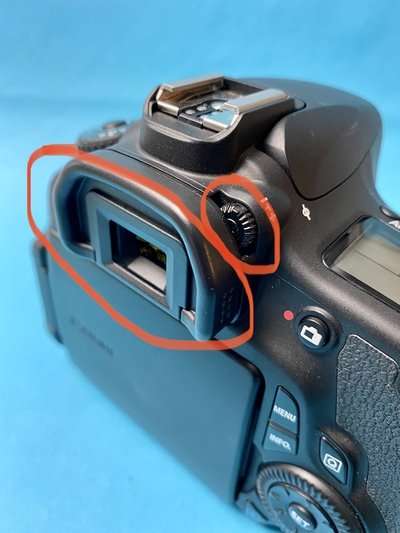
The Diopter
Read more: DSLR Cameras
Just next to the top of the viewfinder, around the right side of the top of the Dslr lies the diopter, which helps in controlling the viewfinder power as per the power number on your eyes. It can help people with glasses to operate without them.
LCD Screen
Top-end professional DSLRs have an LCD screen that displays the settings that are currently in use for the picture (or video) to be taken. It is on the right side of the camera.
(.) – White Balance
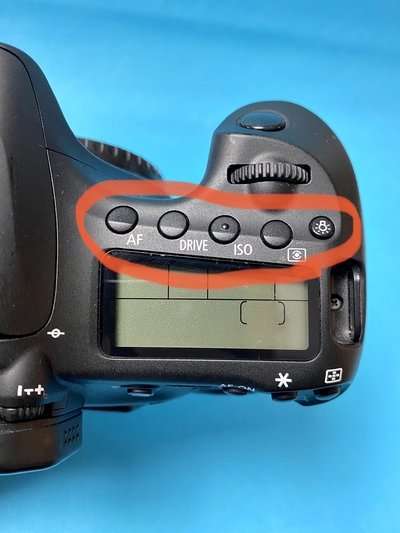
This button helps in changing the White Balance and the metering modes on the go. The top dial changes the metering modes while the dial on the back (bigger with a button in between) changes the White Balance. It is the first button on the right of the flash mount, just above the LCD Screen, where four buttons are lined above it.
AF – Drive
This button helps in changing AF modes and Drive modes. The top dial changes the drive mode – ranging from single shot to 10 seconds timer, etc., and the back dial changes the AF modes. It is the second button on the right of the Metering-WB button.
Read more: Best Courses for DSLR and Mirrorless Cameras
ISO – Exposure Compensation
This button helps in changing ISO and Exposure Compensation. The top dial changes the exposure compensation ranging from -5 to +5, while the back dial changes the ISO from Auto-100-12800 (or 25600). It is the third button on top of the LCD.
Light Button
Pressing this button switches on an orange light in the LCD, helping in seeing and changing settings in the dark.
Shutter Button
The most important button of any camera, shutter button helps in taking pictures when fully pressed. It also helps in metering, and when half-pressed, it helps in doing the auto-focus of the lens. One can disable the focusing and metering features in Canon and assign back-buttons for both of them.

Read more: Photography Courses – Best Online Classes
The Top Dial
This dial helps in changing various settings and is used for quick change owing to its position near the shutter button.
The Back Buttons
The back buttons are separated by the LCD screen that is used to review pictures or videos or to see and change the various settings.
On the left of the LCD Screen are
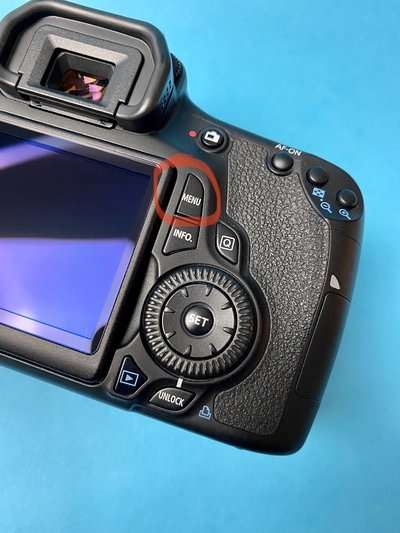
Menu Button
As the name suggests, the Menu button opens up all the options the camera possesses. It takes you into various photo functions, video functions, focus functions, and custom functions.
Some of the standard settings inside the Menu button are:
- Image Quality (RAW/JPEG etc.)
- External Speedlight Control (in case of TTL)
- ISO Speed Settings – including max ISO range and auto ISO range, with minimum shutter speed.
- Multiple Exposure and HDR Modes
- Noise Reduction Settings for Long Exposure and High ISO
- Grid Display
- Silent LV Shoot
- AF Settings for different types of subjects
- AF-assist beam firing
- Selectable AF Point
- AF Area Selection Method
- Protect/Rotate/Erase Images
- Image Copy
- RAW Image Processing
- Resize
- Highlight Alert
- Playback Grid
- Histogram Display
- File Name (Conventions)
- Format Card
- Auto-Power Off
- LCD Brightness
- Date/Time/Zone
- Language
- HDMI Frame Rate
- Video System
- Battery Info
- Sensor Cleaning
- Custom Shooting Modes Settings
- Firmware
- Copyright Information
- Exposure Level and ISO speed setting Increments
- Warnings in Viewfinder
- Cropping Information
- My Menu Settings
Info Button
It serves a dual purpose. When in viewfinder mode, it displays various settings, which are the settings of C1, C2, and C3(modes), WB/Shift/Bkt settings, WB, Color Mode, Long Exposure Noise Reduction and High ISO Noise Reduction Settings, File Name, and Possible Shots (& Freespace).
When using live view mode for photography or video mode, it starts from a blank screen with only the frame with exposure in front, to the aperture, shutter, exposure meter, ISO, possible shots, and battery info.
Further pressing the button also displays the WB Mode, metering mode, AF mode, Picture Style, NR, Drive Mode, and Card settings. Pressing it further displays a histogram (luminance). Also pressing it removes the histogram but adds a scale that helps in straightening the horizons.
Picture Style
It helps in setting picture styles for images or editing the picture styles for images already shot.
RATE
It helps in rating images on 1 to 5. One press gives a single rating, while five presses give five stars rating.
Zoom
As the name suggests, it helps in zooming in while focusing (in live screen mode) or while viewing pictures in play mode.
Play
It helps in playing back the images and videos that have already been shot.
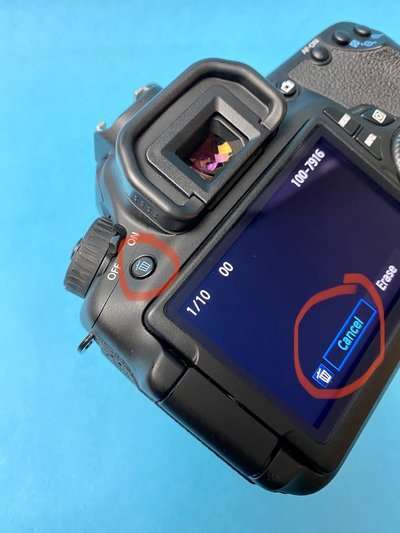
Delete
Read more: Macro Photography Techniques Courses & E-Books
It helps in deleting the image or video that is currently visible on the LCD.
On the Right Side of the LCD Screen
Start/Stop Switch
This switch starts and stops the video recording when in video mode, and switches the mode from live view to the viewfinder (and vice-versa) when in photo mode.
Photo/Video Dial
This is the dial to set whether you are shooting video or picture. The picture can be shot in video mode with the shutter button, while video can’t be recorded in photo mode.
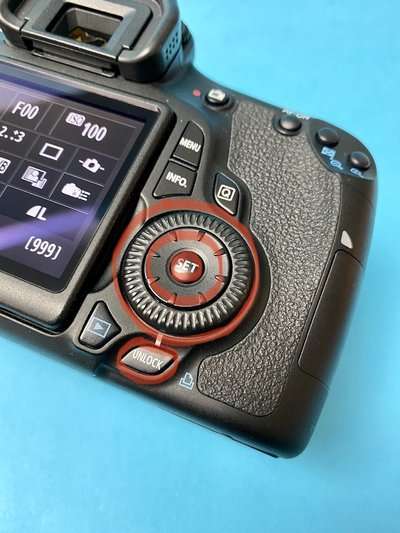
Dial (or Wheel) with SET Button
This dial helps in various settings, including all the parameters which are accessed via the Q button. While shooting, though, it controls the exposure compensation (or the aperture in the Manual Mode). It also helps in browsing through the images via the play button, among the other things it can do. The Set button, in the midst, as the name suggests, helps in the settings.
Q Button

Q button opens up the various settings when shooting photos in the viewfinder mode. It opens up all the settings a photo needs in the order:
- Mode (just the display – the mode can only be changed via mode dial)
- Shutter Speed
- Aperture
- ISO
- Exposure/Exposure Compensation
- Flash Exposure Compensation
- Custom Controls
- Picture Style
- White Balance
- Auto Lighting Optimizer
- AF Mode
- Metering Mode
- Drive Mode
- Card Selection and Settings
- Image Settings
Lock Switch
It locks the wheel from accidentally changing the exposure compensation or aperture accidentally. When switched on, the wheel will still rotate, but the settings won’t change due to the accidental rotation.
Joystick
The joystick is used to move between settings in the Q mode, change the focus point when in live view mode, and move to various parts of the image in the zoomed-in version of the previous image on the display, or on the zoomed-in version of the current frame to help in focusing and reviewing.
AF-ON
This is the button that helps in back-button focusing and provides for fast shooting.

This button can be set up for anything that one uses very often. For example, it could be used for exposure lock or focus lock (can be set in the custom controls)
Focus Mode and Buttons
This button helps in browsing between various options of focus buttons and modes.
Various Buttons on the Front of the Camera are:
DOF Preview Button
Depth-of-Field Preview Button locks the aperture to the settings you have instead of wide open and gives a review of the depth-of-field and the exposure that will be actually there.
Lens Release/Lock Button
This button, when pressed, releases the lock that binds the lens to the body. When the lens is attached to the body properly (by matching the red or white markers), it automatically locks in, and the click sound is heard (not the shutter click).
The Various Buttons on the Lens are:
AF Mode
AF Mode switch is there in lenses with features of Auto-Focus. Switching it on allows the camera’s auto-focus controls to control the lens. Switching it off will require you to use manual focus via the focus ring, or focusing via moving in or out.
IS Mode Switch
IS or the Image Stabilization Switch helps in switching on and off the Image Stabilization. Nowadays, there are several lenses with more than one IS Mode, and the switch incorporates the options. Do note, not all the lenses have an IS Motor, and hence may not have IS Mode Switch, which means it is permanently off.
It is imperative that one knows and understands his or her camera before embarking on a long journey towards personal and professional creativity.
Links below are affiliate links. For more information, please read “Full Disclosure”
Thank you for your support!
Online Courses for DSLR Cameras: