Last Updated on January 23, 2022
What is ISO In Photography?
Some photography books might start talking about setting exposure via a different order, like Aperture or Shutter Speed and leaving ISO to be the last thing to set. That is indeed a good practice; but experience has taught us that taking ISO as exposure’s starting point, is a very wise move.

Read more: Photography Basics
Let’s Define What ISO Is In The First Place
Page Contents
ISO was formerly called ASA back in the days of film and is the main reason why professional photographers needed to carry several cameras around for one gig. Interchanging lenses was possible, but being able to change ISO on the fly was the impossible thing.
ISO is the only thing that has been fully transformed with digital photography after the replacement of film. Both aperture and shutter speed are still moving mechanisms, but ISO is the electronic emulation of film sensitivity.
Let’s explain this a little bit slower. The film was manufactured with different levels of sensitivity by adding larger and larger grains of silver particles. These reacted to light, resulting in photographs when light passed through the camera after pressing the shutter button.
These levels of sensitivity were pretty much the same as modern ISO values:
ISO 100 200 400 800 1600 3200 6400 12800
Well, maybe some values were different. ASA 125 was pretty popular, and the film reached up to 3200, but you get the idea.
ISO is not a magical way of simply compensating underexposed photographs, each stop increment (e.g. increasing your ISO from 400 to 800) forces your sensor to be more sensitive to light. This maneuver adds different amounts of static as you increase the values; resulting in a very much undesired feature among us photographers, the infamous “Noise”.
Camera manufacturers have indeed been making better and cheaper sensors with the years, but we still highly advise you to check out where your camera’s limit. Back in the day when I started doing digital photographs, I couldn’t get higher than ISO 400 without some nasty noise (which included nasty RGB blobs all over the place).

What Do These Numbers Mean Then?
We suggest starting your exposure set-up by firstly defining the ISO value because after all, you’ll be moving it in a lesser way than Aperture and Shutter Speed.
ISO has been designed to behave correctly upon the lighting in front of your camera during a specific moment. Therefore, if you are shooting inside your house, or in the streets, the light might be a decently constant after all. Unless of course if you walk through harsh shades during midday, or if you are constantly switching between the inside and the outside.
Let’s talk about ISO 100 before the others, after 100, all values will just increase sensitivity (and static, remember that). This value is usually the baseline of almost all digital cameras nowadays; unless you own a Fuji, which could start in 200 depending on the model.
Some cameras can also emulate ISO 50, so you can have some fun while shooting landscapes or under extremely generous amounts of light. Back to 100, this is the least light-sensitive value and is the appropriate value when shooting under sunny situations.

ISO 100
Useful Tip: ISO 100 is also a popular value while shooting in a studio or long exposures. We will discuss the last one on the Shutter Speed section.
Show Me the Numbers!
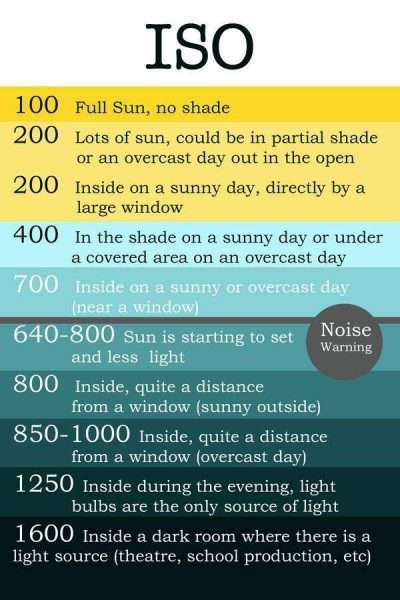
- – ISO 200: If 100 was perfect for full sun with no shadows at all, this one is perfect when the light starts dimming out. For example when shooting under mild shades, overcast skies, or simply inside your place near a window.
- – ISO 400: Depending on the time of the day, like those moments in which the sun is starting to come down the horizon. This value is perfect for deep shade or heavily overcast days too.
- – ISO 800: Here is where you might start noticing a bit of noise, so be careful, remember to find the sweet spot that you’ll be willing to tolerate when it comes to noise. This value is perfect for early, or late hours of the day like sunrise or sunset, or for moody interiors too.
- – ISO 1600: This one should only be used during low light conditions
- – ISO 3200: Use it under dark situations, but only if extremely needed.
- – ISO 6400: Now we are reaching the limits, use it only as an emergency move.
If you think about it, all these lighting situations change slowly if you are not moving too much around. Hence the need for defining it first. See how’s the light surrounding you behaving, and then set up your ISO.
Further Readings:
Photography Courses – Best Online Classes
Smartphone Photography Courses
Best Courses for DSLR and Mirrorless Cameras