Last Updated on January 23, 2022
Introduction to Lightroom: The Master Program Every Photographer Must Use
I was a Photoshop purist. I couldn’t put my mind across why someone would need anything if they have Photoshop. Especially with Windows 10 coming with an image viewer capable of displaying RAW and TIF files. Until I actually opened Lightroom and was blown over by what it offers.
Arguably, what Lightroom offers is similar to Bridge + Camera RAW (both Adobe). But it is perhaps the only complete software within itself capable of carrying out complex retouching, as well as managing files, while also helping make lives easier for photographers.
So if you aren’t using Lightroom yet, either you have plenty of extra time at hand, or you have been advised wrongly. Let’s just dive into this Room full of Light!

@Images by Raghav Gautam
Lightroom as an Image Management Tool
Page Contents
Arguably, the strongest suit of Lightroom is the Library. The Lightroom catalogue is perhaps the best feature the software has to offer.
This is one place where you can organise your pictures, folders, etc., in the best possible way, without ever worrying about losing track of important projects. Learn more: Top Adobe Lightroom Courses
Some of the features that Lightroom as an Image Management Asset offers are:
The Modules of Lightroom
Even the most frequent users of LightRoom are unable to use all the features this powerful all-in-one software provides.
From organising, cataloguing, retouching, GPS mapping, to showcasing in various forms on web and paper, LightRoom does it all. Let us look at the modules of this beast.
- Library
- Develop
- Map
- Book
- Slideshow
- Web
Library: The Organizer
The library is the one reason why the photographers who love Lightroom do so; it is because of the library. Lightroom Library is similar to file explorer. Only that it allows us to view, manage, mark, stack, and arrange photos in a more precise manner.

All you need to do is add folder and see all the data managed beautifully within there. You can also add sub-folders, and synchronise the files as per the changes and updates – including addition or deletion of the files.
If you move files from one place to another, all you need to do is simply update the link and Lightroom will find the settings it had. What’s more, it can help in managing and syncing metadata across the files in a folder.
The images, when edited in another software, get placed next to the original image automatically (unless you change the default settings). Overall, the Library is the most essential part of Lightroom because it also includes the Catalog – the reason that makes Library so powerful.
See more: 5 Free Presets for Lightroom
The Catalog – Features and Class!
The Lightroom Catalog stores all the image data. This includes the folder structures, the image files, the .xmp files (or the edited versions), the ratings and colour labels, among other things.
So, what’s the big deal, it’s a heavy file manager – isn’t it? No.
The Lightroom Catalog can be moved.
So once you update your Catalog, you don’t have to worry for a lifetime. You can upload your Catalog on the cloud, and take it with you anywhere.
You can keep it on an external SSD instead of the system disk, and you can move it across devices.
*Disclosure: Some of the links below are affiliate links, meaning, at no additional cost to you, I will earn a commission if you click through and make a purchase. Thank you for your support!
The Cloud Reminds Us – The Adobe CC Photographer’s PlaN
Yes, that’s what they’ve named it. It includes Adobe Photoshop CC + Lightroom CC Classic+ LightRoom Mobile + Adobe Portfolio Site along with other tools. What it allows us is to have some of our pictures synced over the cloud, and be accessible across devices we use Lightroom.
This means you can show pictures from Lightroom Mobile if you don’t carry the system. This also means that you can keep a portfolio of images in mobile, with some editing functionality available on mobile as well. There’s a plan with 1TB of cloud storage, while the basic one comes with 20GB.
Learn more: Best Photoshop Courses
Develop: Adobe Camera RAW within the Lightroom
What Library + Develop offer is something similar to Adobe Bridge + Adobe Camera RAW. With very few changes in the same tools and commands, it is only the ease of working in a single software that helps Lightroom, having just to double click or hit enter on an image to enter the editing mode.
This, in addition to the ability to Edit in External Program, and have the new image stacked exactly near the previous one.
Parts of Develop:
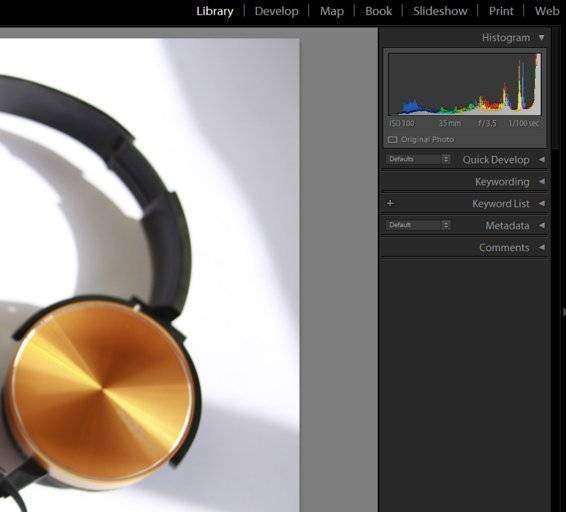
Histogram

The histogram is the part which shows whether the images are correct in exposure, or if any clippings are occurring.
There’s a luma histogram, and there are histograms for RGB separately too – although stacked on top of the white one.
It allows pro editors and retouchers to control their edits without going overboard.
Colour Profile, Light, and White Balance

Colour Profile refers to the profile for shooting and editing. It could be colour or monochrome, and different styles within the colour too.
White Balance column lets you adjust the White Balance in the form of a colour slider, with a tint slider also available alongside.
Light helps you cover the exposure, contrast, shadows and highlights, darks and whites, clarity, vibrancy and saturation (in the colour tab just below). This, in short, is all the exposure settings you are going to need.
Curves
Curves tab is where you can micro-manage the contrast instead of directly using the slider. Slider updates the contrast while working on highlights and shadows proportionately, while the curves give you an option to alter them separately.
Curves are also more intuitive for most photographers who have been born over the use of histograms. Alternatively, you can also edit using histograms themselves.
HSL/Color and Split Toning
HSL/Color is where you control the saturation, luminance, and hues of the picture. Here, you can even change the colour of the leaves from green to yellowish, make the skin brighter, and do selective colouring, along with controlling the various shades of monochrome photography – all in the form of sliders.
Split toning, most commonly used in colour grading and films, is where you give different toning to highlights and shadows while making sure it does not go overboard.
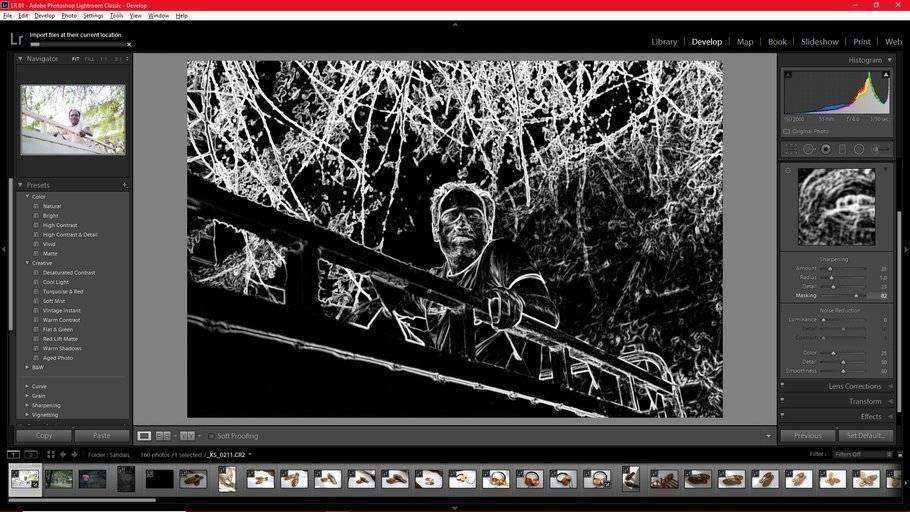
Details
The details tab is one of the most useful tabs for photographers on the go. Helping in improving the sharpness it works on the concept of unsharp mask. Thus, you can control the masking area of the sharpness and get more excellent results.
Also, being able to preview the results live helps a long way in making the project work well.
Noise reduction is also a part of the details tab. With the ability to preserve details, and work with contrast; LightRoom offers noise reduction and colour noise reduction.
Lens Corrections, Transform, & Effects
Lens Corrections tab provides one of the most fundamental useful attributes of Lightroom. With a library boasting of almost every popular lens ever made, the lens profiles with error and chromatic aberration count of the lenses are stored.
The image can be automatically corrected in terms of the lens distortion and chromatic aberration by just hitting a checkbox. It can further be manipulated along with various angles, to make sure you get the best controls in distortion and chromatic aberration control.
Transform controls are in addition to lens corrections, used to straighten lines, horizons, buildings, etc., by changing the verticals, horizontals, angle, etc.

Lightroom comes with certain inbuilt settings to help you go through the transformation process in a breeze – which includes upright, auto, level, vertical, full, and guided modes.
Effects include post-crop vignetting. What it means is that whenever you crop the image, the vignette will readjust itself.
There are modes in vignetting, including highlight priority, colour priority, and paint overlay – each coming with highlight protection.
So if you use vignetting, and some part of the image seems to be burning, you can always simply use highlight protection.
Calibration: Not for 99% of the Users
Lightroom offers this pro-tool called calibration. Calibration of cameras can go off, and sometimes there’s an issue between sync from the camera to system.
In such cases, you can work on calibration to bring out accurate results. This is also a helpful tool to be used in conjunction with various colour checker tools available.
Map: Managing the Geo-Tags

GPS in the cameras is one of the regulars in these days. The cameras can map to pin-point accuracy the place of the image.
This helps in charting out the images on to a map, and then doing the analysis, or writing blogs, or arranging pictures across the map.
Book: Designing Quick Photo-books
Photo-books are one of the most important factors of a photographer’s life. While there are several programs focused on making quality photo books, there are hardly any of programs that can help you multitask with the images in hand.

This, along with the fact that you don’t always need hi-fi photo-books. Often, simpler books work. Lightroom has a solution for this problem with the Book feature. It allows you to customise the following features:
Book type:
- Blurb Photo Book
- Blurb Magazine
- Blurb Trade Book
- JPEG
Size:
- Square, Landscape, or Portrait
- 7 inches to 12 inches – customizable sizes.
- Cover Options
The above options are directly synced with “blurb“, where you can directly order for prints of photobooks. There are multiple layout options, along with logo placeholders, among others.
Headers and footers, page bleed, etc., all options available in professional book designing software are available in Lightroom Book too.
Slideshow: Get the Show Running

A slideshow is where you can simply browse through the images in one go without having to go through the tedious arrows.
Couple the slideshow feature with the various selection modes that Lightroom offers.
Lightroom allows selections based on:
- Ratings: you can press between 1 to 5 to rate an image between 1 to 5, and then filter images by their rating. It could be four stars or more, or 2 stars or less, depending on how you want to go about it.
- Colour Labels: you can put colour labels on the images and then filter based on colour labels.
- Flagged: you can filter the flagged images, often to check if there’s any useful image in there which has been flagged by mistake.
- You can also filter on the basis of exposure info and location columns.
Print: A Photographer’s Final Dream
Every photographer dreams of printing their books and having their prints. But prints are also one of the toughest aspects of photography. With the in-built Print Tab on Lightroom, you can simply focus on creating the best picture possible, and Lightroom will do the rest.
With the print tab, you can go through the paper size, paper type, layouts, bleeds, margins, print resolution, and sharpening to get the best possible result out of your system.
Web: Publish Directly Online

You can publish to galleries online directly via Lightroom. This especially helps when working with the images you wish to upload online. It can be synced with Adobe Portfolio, Behance, and several other galleries which allow embedding HTML galleries.
All in all, Lightroom is a software that is capable of doing almost everything a photographer needs. Add the ‘Edit in Photoshop’, or ‘Edit in External Editor’ as options, and Lightroom emerges a clear winner as the software every photographer absolutely must-use.

